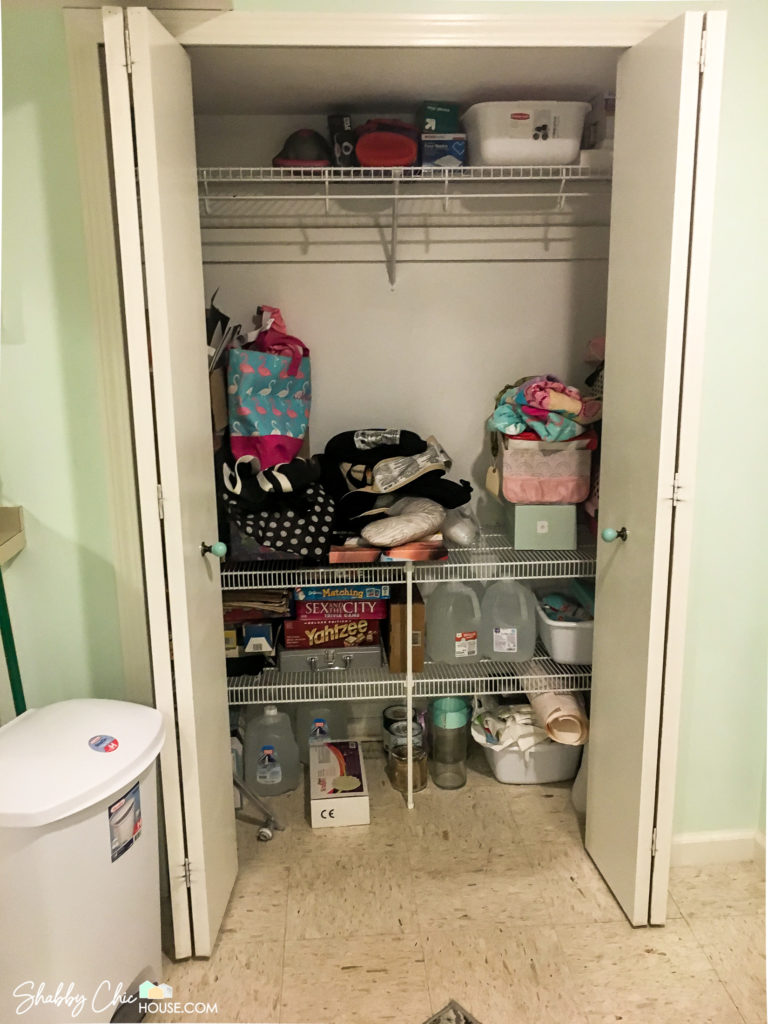
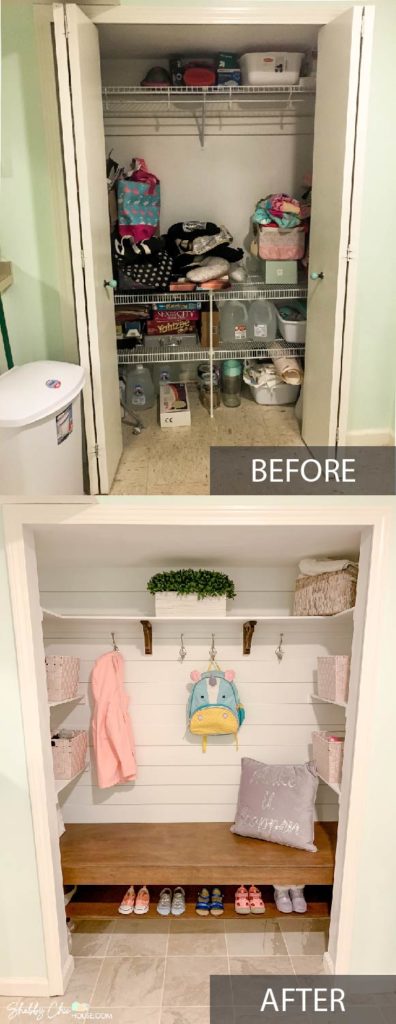
From Boring Closet to Awesome Shiplap Entryway Nook
Below is our ultimate step-by-step tutorial on how to transform your boring entryway closet from a catch-all into a fresh and highly functional shabby chic shiplap entryway nook. My goal is to give you an insane amount of detail on my transformation, so by the end of this read you’ll have the know-how and complete confidence to tackle this closet makeover on your own.

Affiliate Link Disclaimer: Every product we recommend we love and use on used on our own projects. If you do decide to purchase one of the products we mention, you won’t pay a penny more, but we may get a small commission which helps us keep the site up and running/bringing you new and awesome content. Thanks so much for your support!
Removing Old Shelving & Doors
First, remove any old shelving units, closet doors and door tracks. After doing so, you’ll most likely have a variety of holes in you walls. Patch these holes with a spackling blade and your standard issue dry wall compound.
Most closets have textured interior walls and ceilings. In order to put up your shiplap, you’ll need a flat surface. Quickly hit all of the textured areas with a palm sander before you start skim coating.
I love this Dewalt palm sander as the dust collector helps me minimize the amount of dust sprayed throughout the room and therefore, the amount of clean-up.
Skim Coating Your Closet Walls & Ceiling
If you’re not familiar with skim coating, it is the process of putting a thin layer off drywall mud/compound on a surface to level it out. In order to skim coat, you’ll need:
- Drywall Compound
- Drywall Mud Pan
- Stainless Steel Taping Knife
- Sanding Sponges
- Respirator (You might have a few lying around nowadays)
Using a drywall mud pan makes it easier to get an even amount of compound on your spackling blade. This is essential to get a nice and even coat of compound on your wall.
Start in one corner of your wall or ceiling and slowly work your way across the space. Your goal is to make a level surface while applying the thinnest layer of compound possible. Be careful not to spread your compound on too thick, as you only need a very thin layer.
In my closet I applied one coat of compound, waited a day for it to dry, sanded and then repeated the entire process again.


Making vs. Purchasing Shiplap
You can make your own shiplap by purchasing a few sheets of 4′ x 8′ plywood and ripping them into 4-6″ sections. However, Shiplap has now become so popular that Home Depot sells 8′ and 16′ shiplap in three different colors. A 8′ white shiplap board is only $4.98!
For me, the low price outweighed the inconvenience of having to rip 2-3 pieces of plywood into many smaller boards. Also the shiplap boards come in white, so there’s no need to prime before you paint. Last, Home Depot’s Shiplap is tongue and groove, making it easy to get consistent spacing.
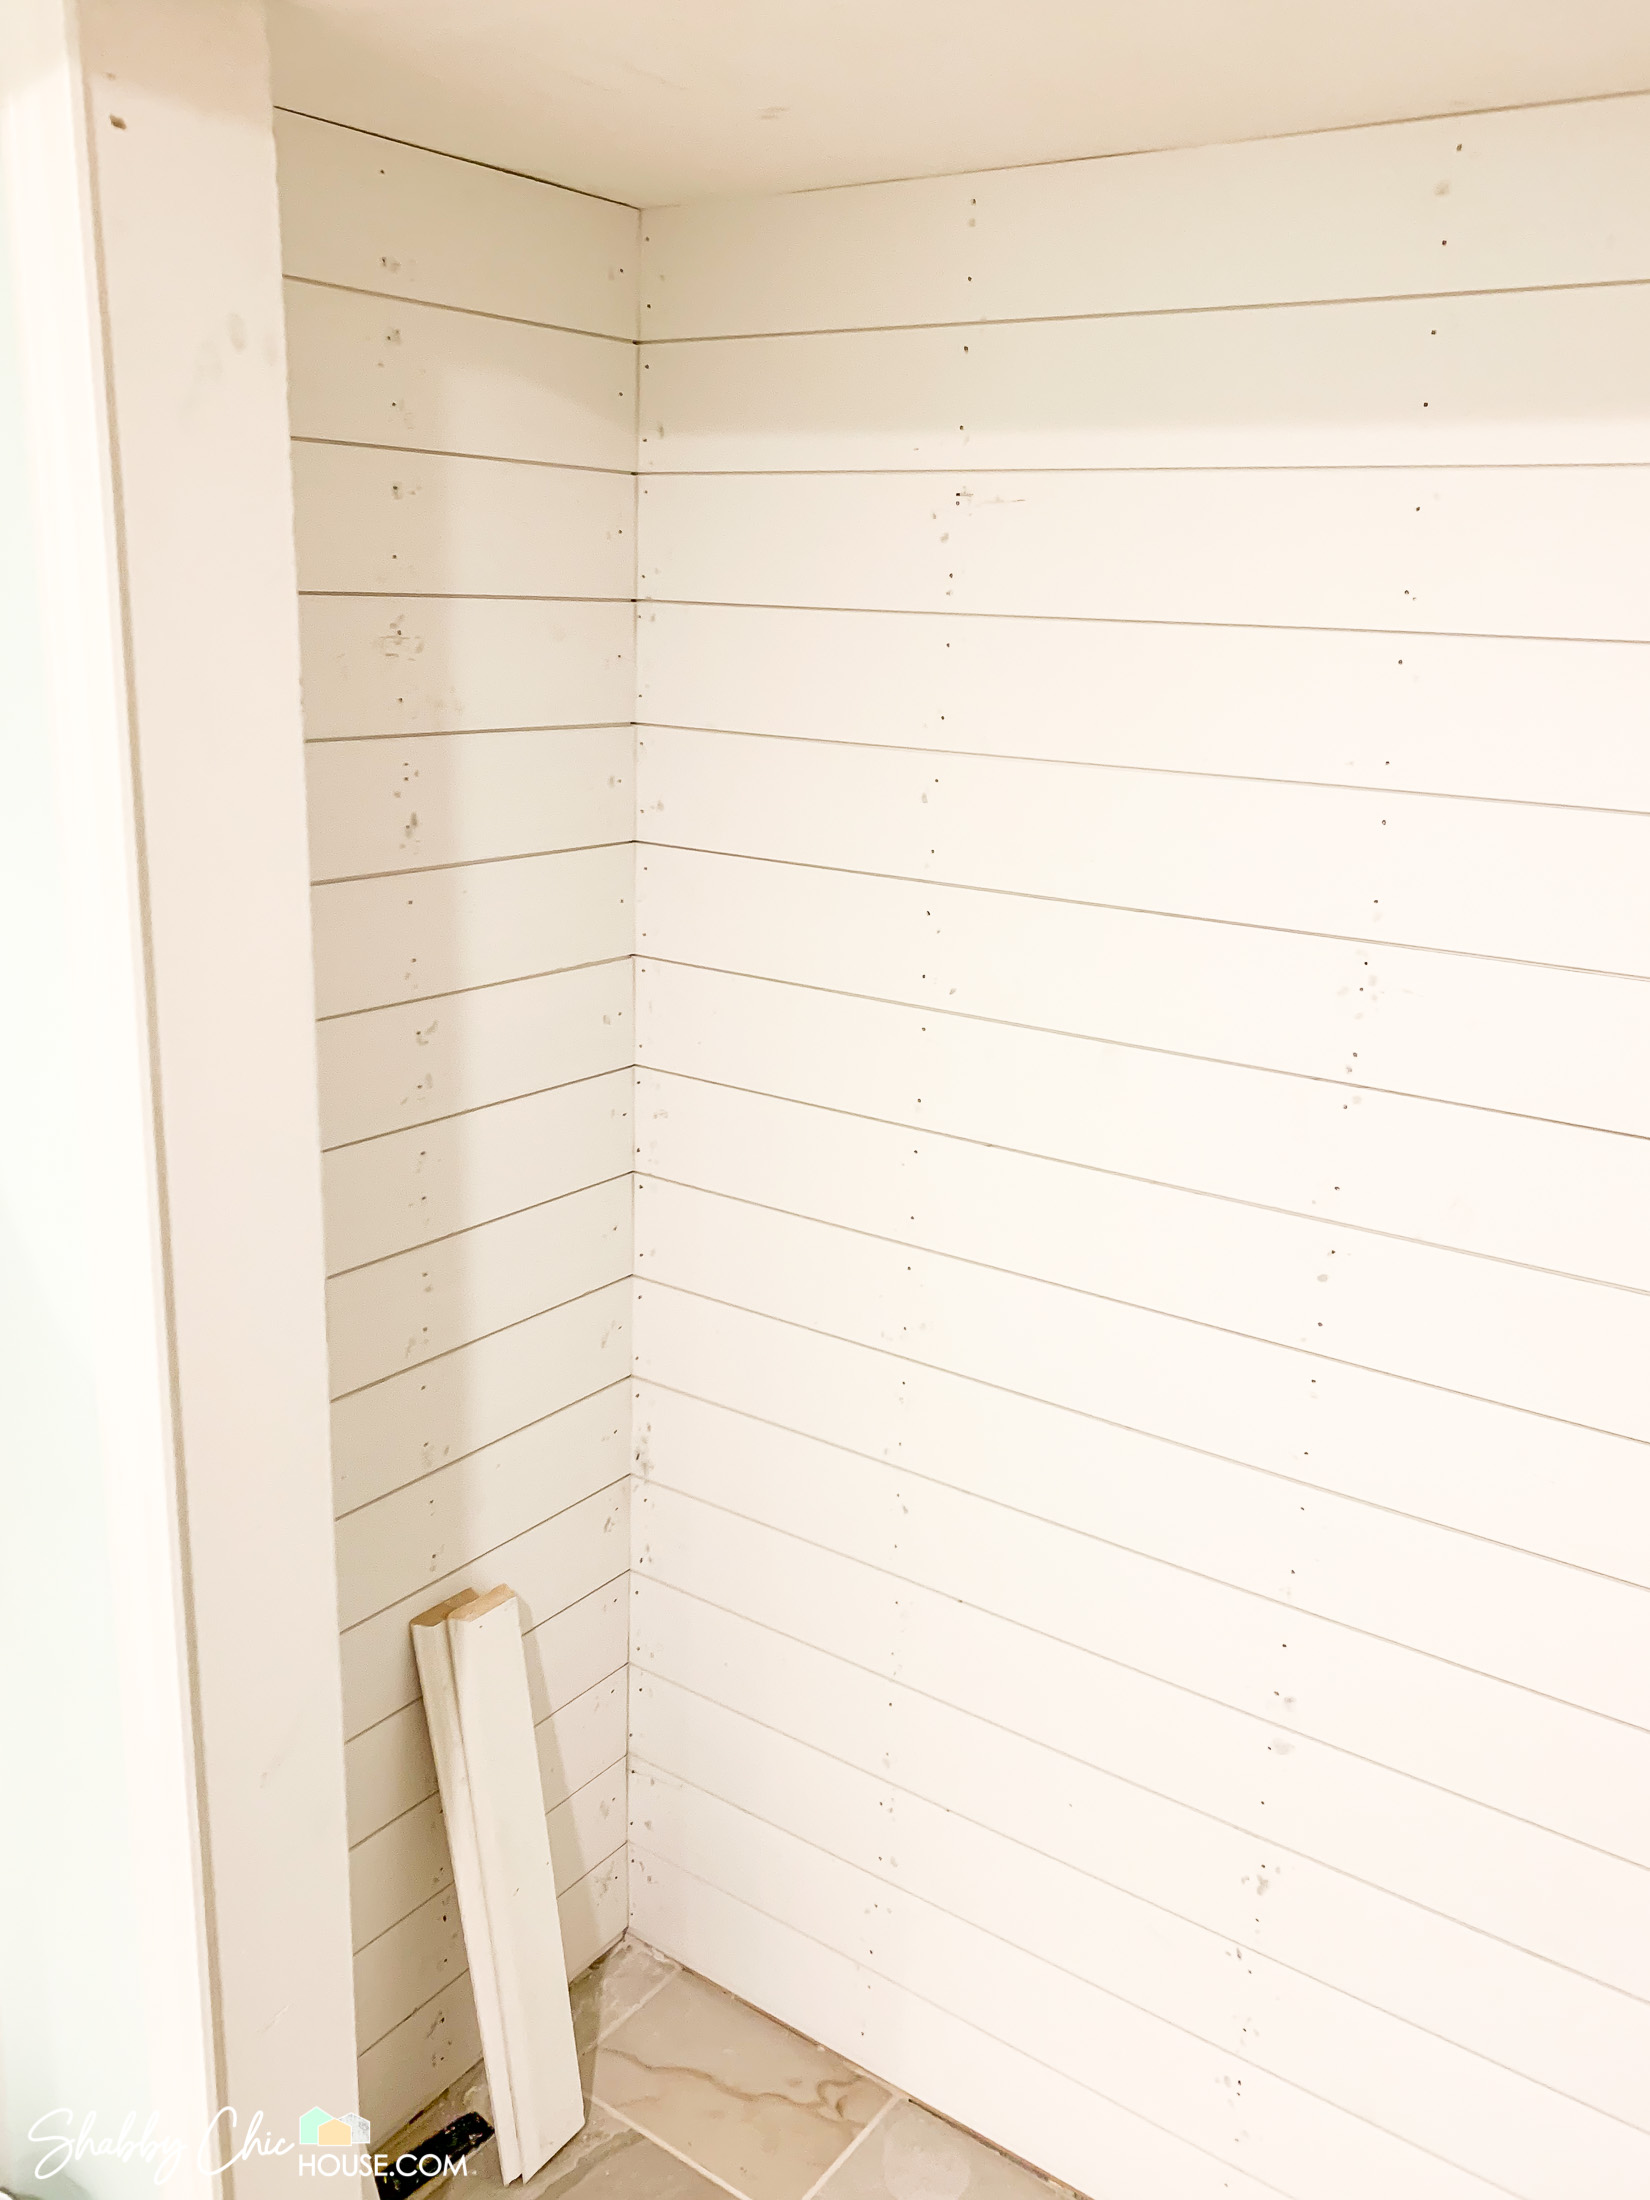
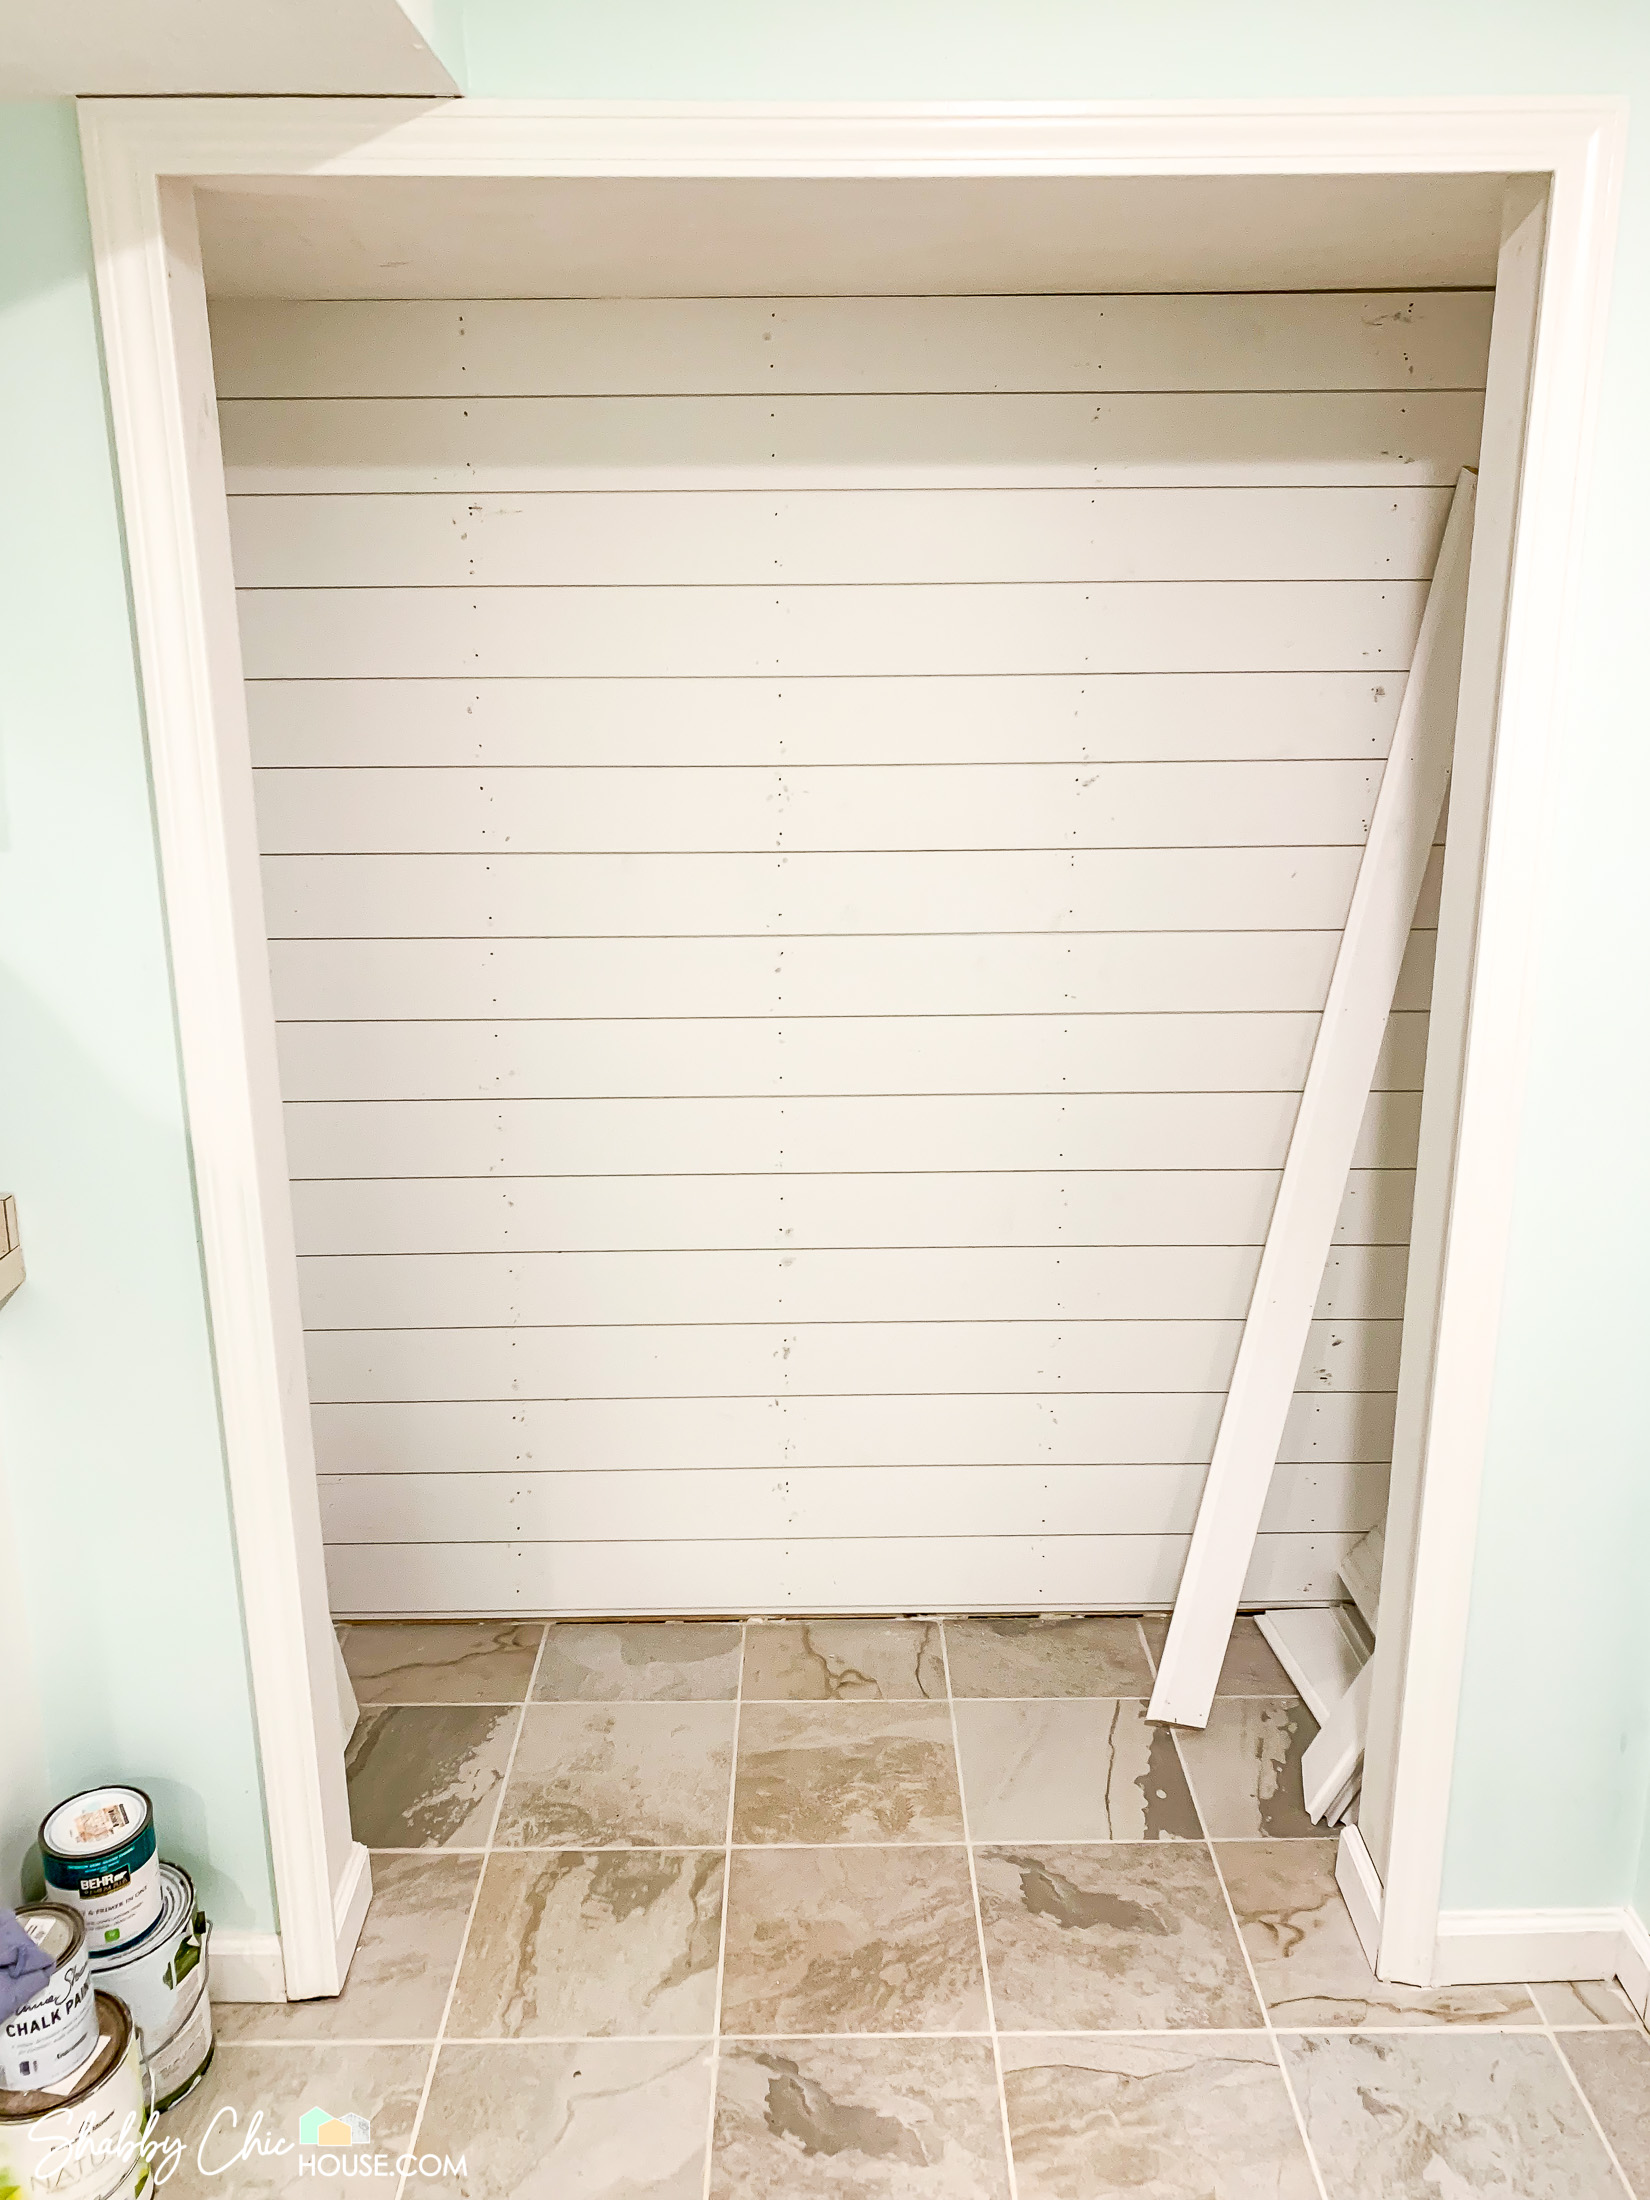
Putting up Your Shiplap
Tools you’ll need:
- Table Saw (I have & absolutely love this Dewalt)
- Measuring Tape
- Level
- Nail Gun & Compressor or Finishing Nails & Old-School Hammer
- Punch Set
The first piece of shiplap you put up should be at the very top of your wall. Since the top of the wall is at eye level, it’s better to have a full shiplap board here and if necessary, a partial shiplap board at the bottom of the wall, where it is less noticeable.
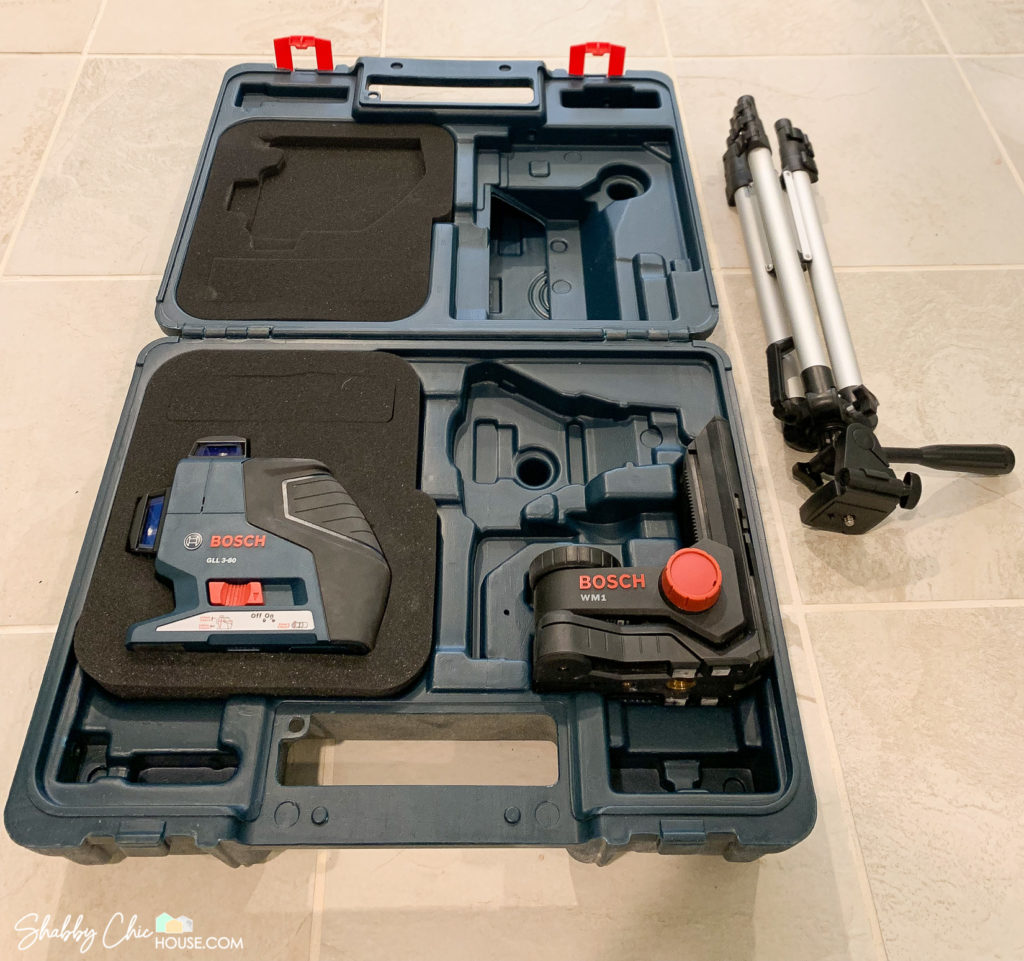
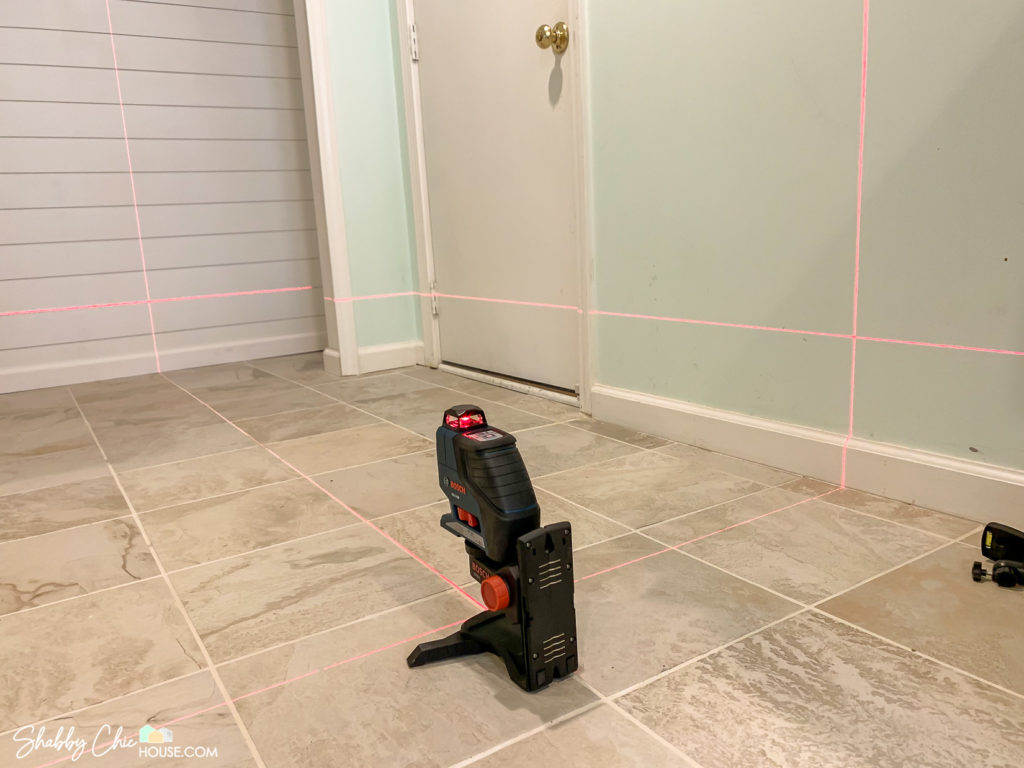
I used this awesome Bosch laser level to make sure the first board I put up near the top of the ceiling was level and then to check my work as I progressed down the wall. Simply set the laser level up on a tripod to your desired height and hit a button. The laser level will automatically level itself and then project both vertical and horizontal lines on all six walls in a single room.
As you cut your shiplap it is important to note that you don’t want the boards to fit too tightly between the two walls. Over time changes in temperature will cause your walls to expand and contract. If your shiplap is fit too tight, it will crack.
For this project, I’d recommend purchasing a nail gun & compressor. I have this Metabo pancake compressor and 18 gauge brad nailer that is awesome for shiplap, floor trim, crown moulding, wainscoting and other woodworking projects!
However, I purchased that kit after this project and actually used an old-fashioned hammer, finishing nails and a punch. This is an inexpensive route, but quite a bit more timely as you need to use a punch to sink each nail below the shiplap surface.
Addressing a Gap Between Your Ceiling & Shiplap
A huge dilemma that I ran into with my closet makeover was that the ceiling was not level. The issue here is two-fold. If you put your shiplap flush with the ceiling, you’ll have a visual slant which will look off. If you put your shiplap up level, you’ll have a huge gap between the shiplap and top of the ceiling.
I chose to put my shiplap up level and address the gap. Now you could fill this gap with caulk if it’s small enough. My gap was so significant that I chose to feather in the ceiling with dry-wall compound.
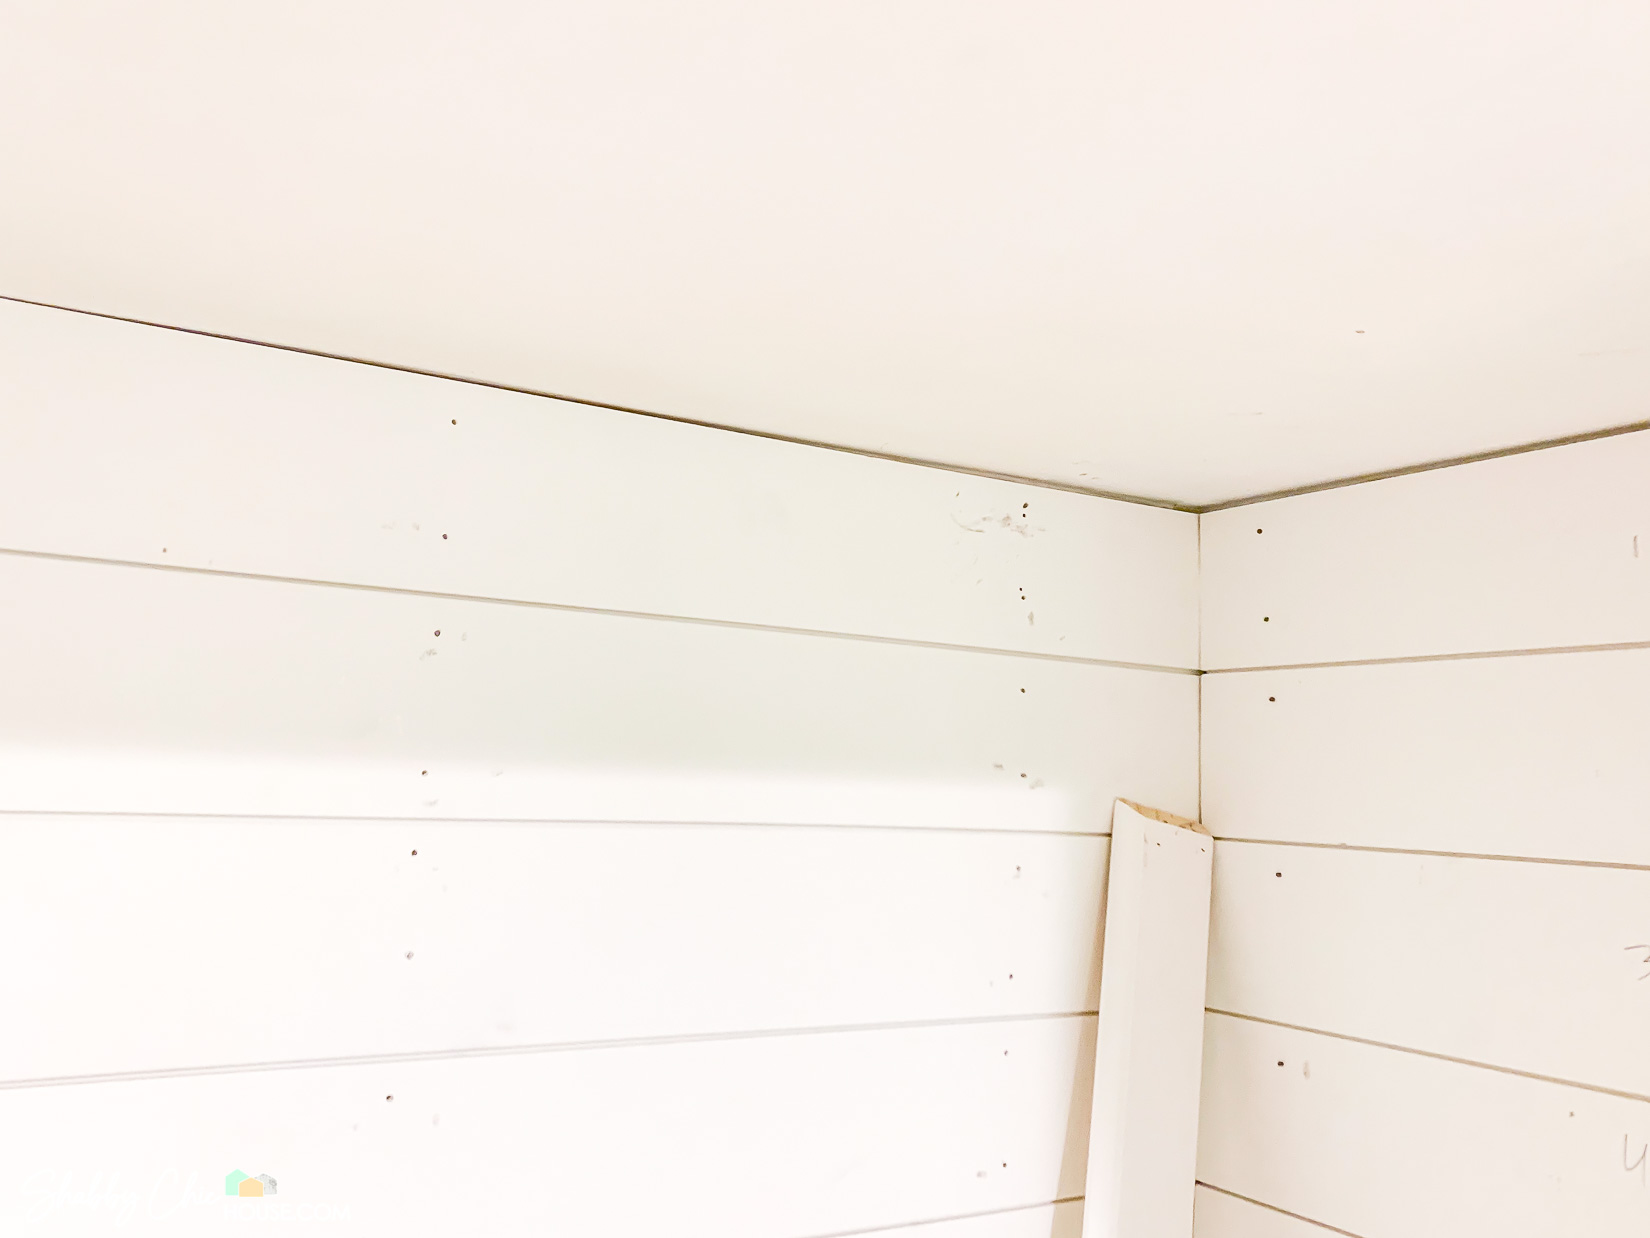
To fix this gap, you’ll need to get your drywall taping knife and compound back out. Slowly add compound near your gap and taper/smooth off towards the center of your ceiling. The goal here is to create a subtle, unnoticeable transition. After applying a few coats of very thin compound, I hand-sanded with a sanding sponge and it looks perfect.
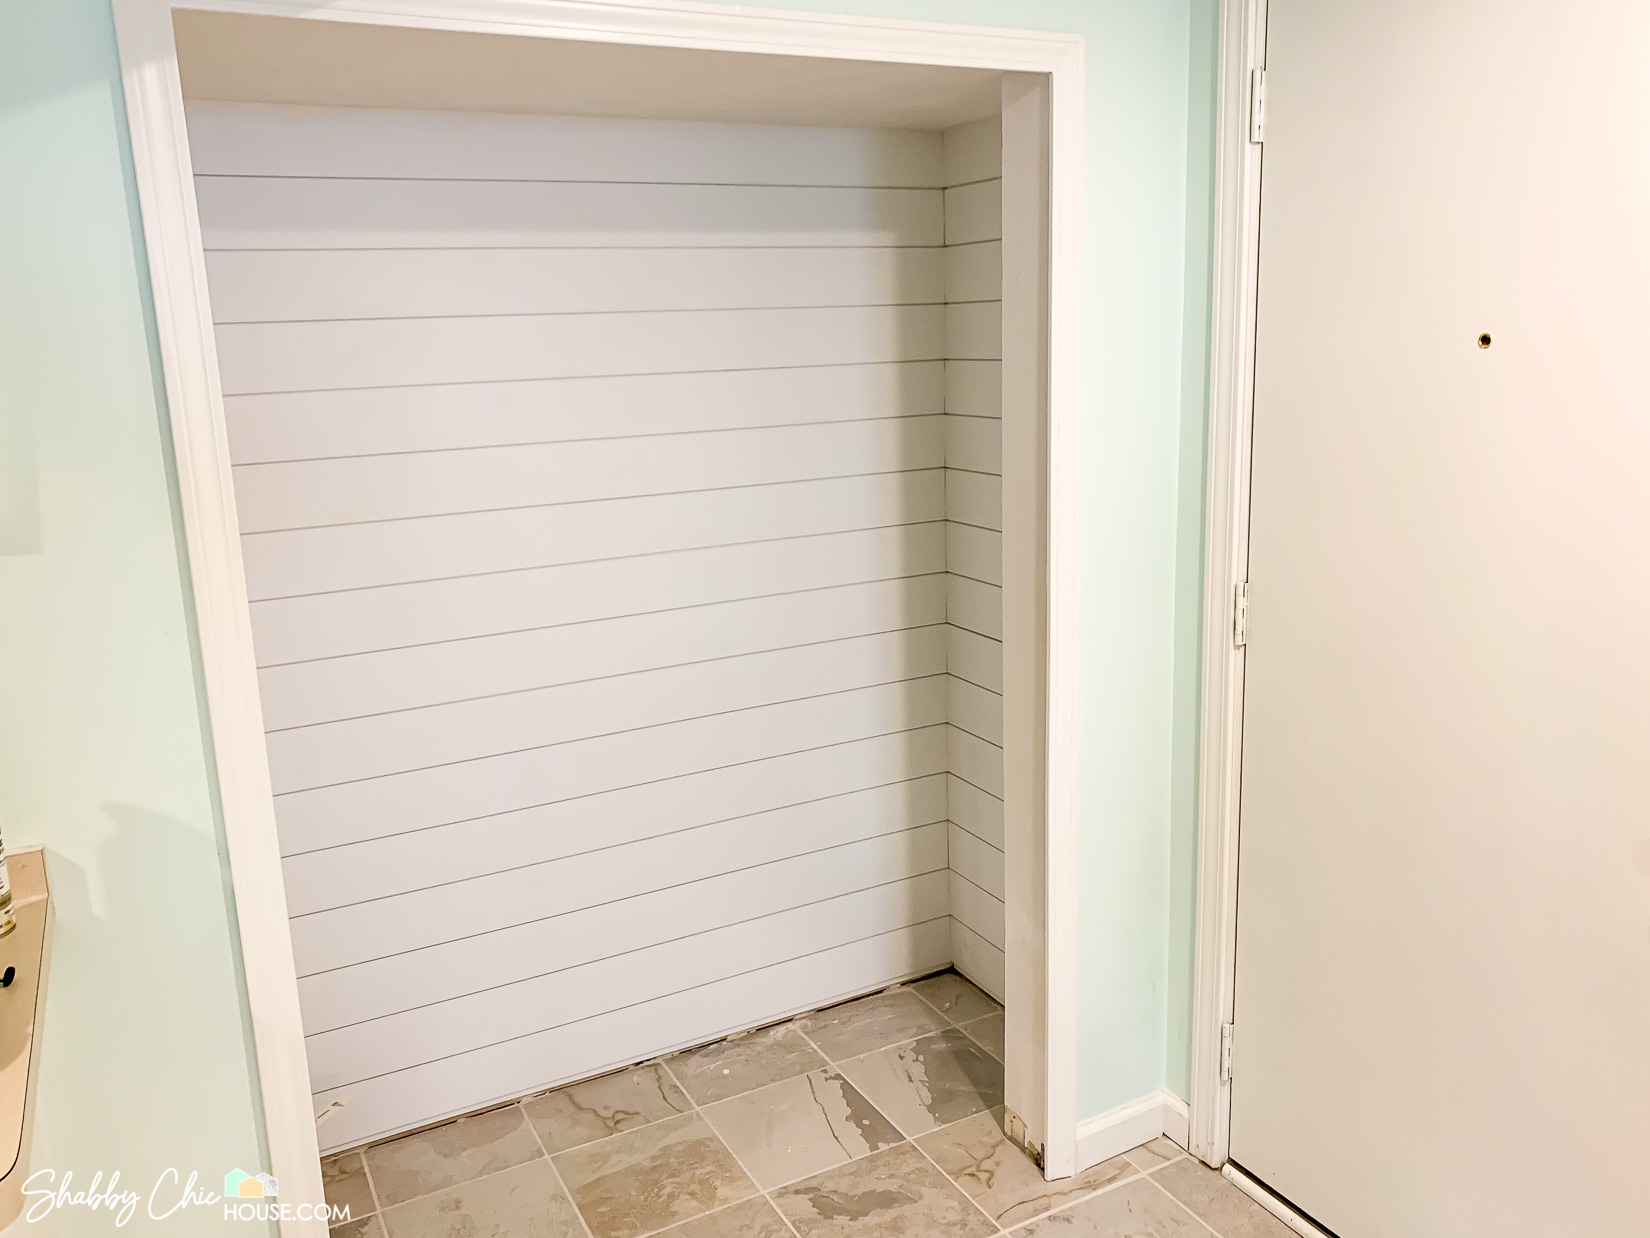
Add Your Baseboards & Fill Nail Holes
After putting up my baseboards, I filled in all the nail holes on both the shiplap and trim with DAP’s Wood Filler. This wood filler goes on pink and then turns white when it dries, which is typically about 20-25 minutes. Once dry, sand, paint and say goodbye to all of your nails!


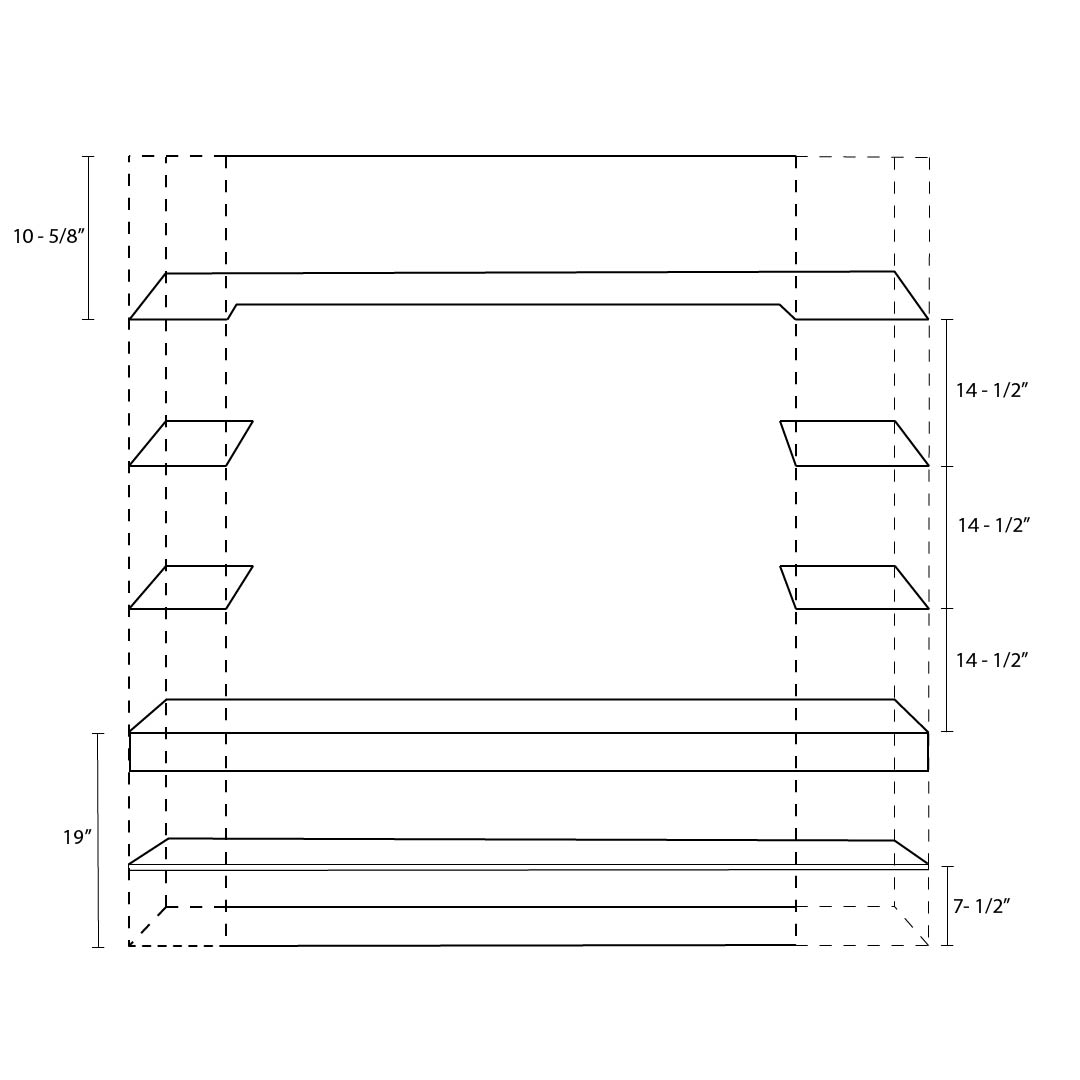
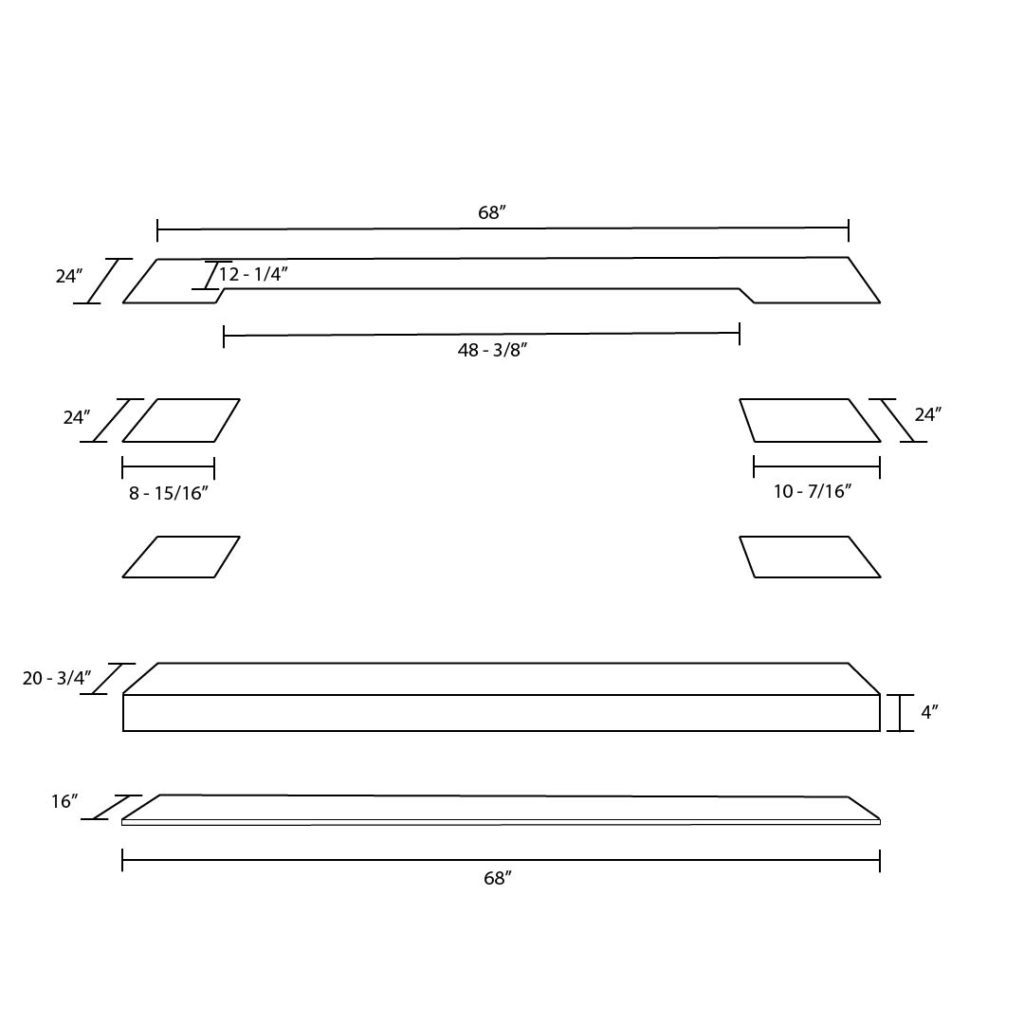
Developing a Blueprint or Plan for Your Shelving
Before you dive right into building your shelves, grab a pencil and paper and draft a rough sketch. This step is VITAL, as having a visual plan of what your nook will look like and measuring your shelves 2-3 times before cutting will save you a lot of headaches.
A great place to start is with the height of your bench. I sat on a few chairs around the house and decided 19 inches was the best height for our bench. I put my shoe shelf a little less than halfway between the floor and bench, which was 7.5 inches off the ground. This height will allow you to fit shoes both above and below the shoe shelf.
Next, plan the optimal height for your primary/top shelf. I wanted this shelf to be right around eye-level and possibly just large enough to store a few rolls of paper towels.
Before I locked in a height for my top shelf, I also considered that I wanted to build two side shelves on each side between my bench and the top shelf. With that being the case, I knew the closet would look best if the three shelves were spaced somewhat equally apart to create a symmetrical look.
Check out the blueprint for my closet makeover below!
Building Your Bench Frame
Once you have a blueprint for your closet makeover, you can begin taking measurements for your bench frame. I chose to put my first bench frame 2×4 on the sidewall as there was a stud in that back left corner which would allow for maximum stability. Also, the 2×4 which I would be using for the frame on the back wall was significantly longer and would therefore lay across several wall studs.
As you’ll see in the photo below I chose not to extend my bench all the way to the front of the closet. I felt doing so would look weird and instead I chose to build a floating bench which ended up 3.25 inches short of the front of the closet.

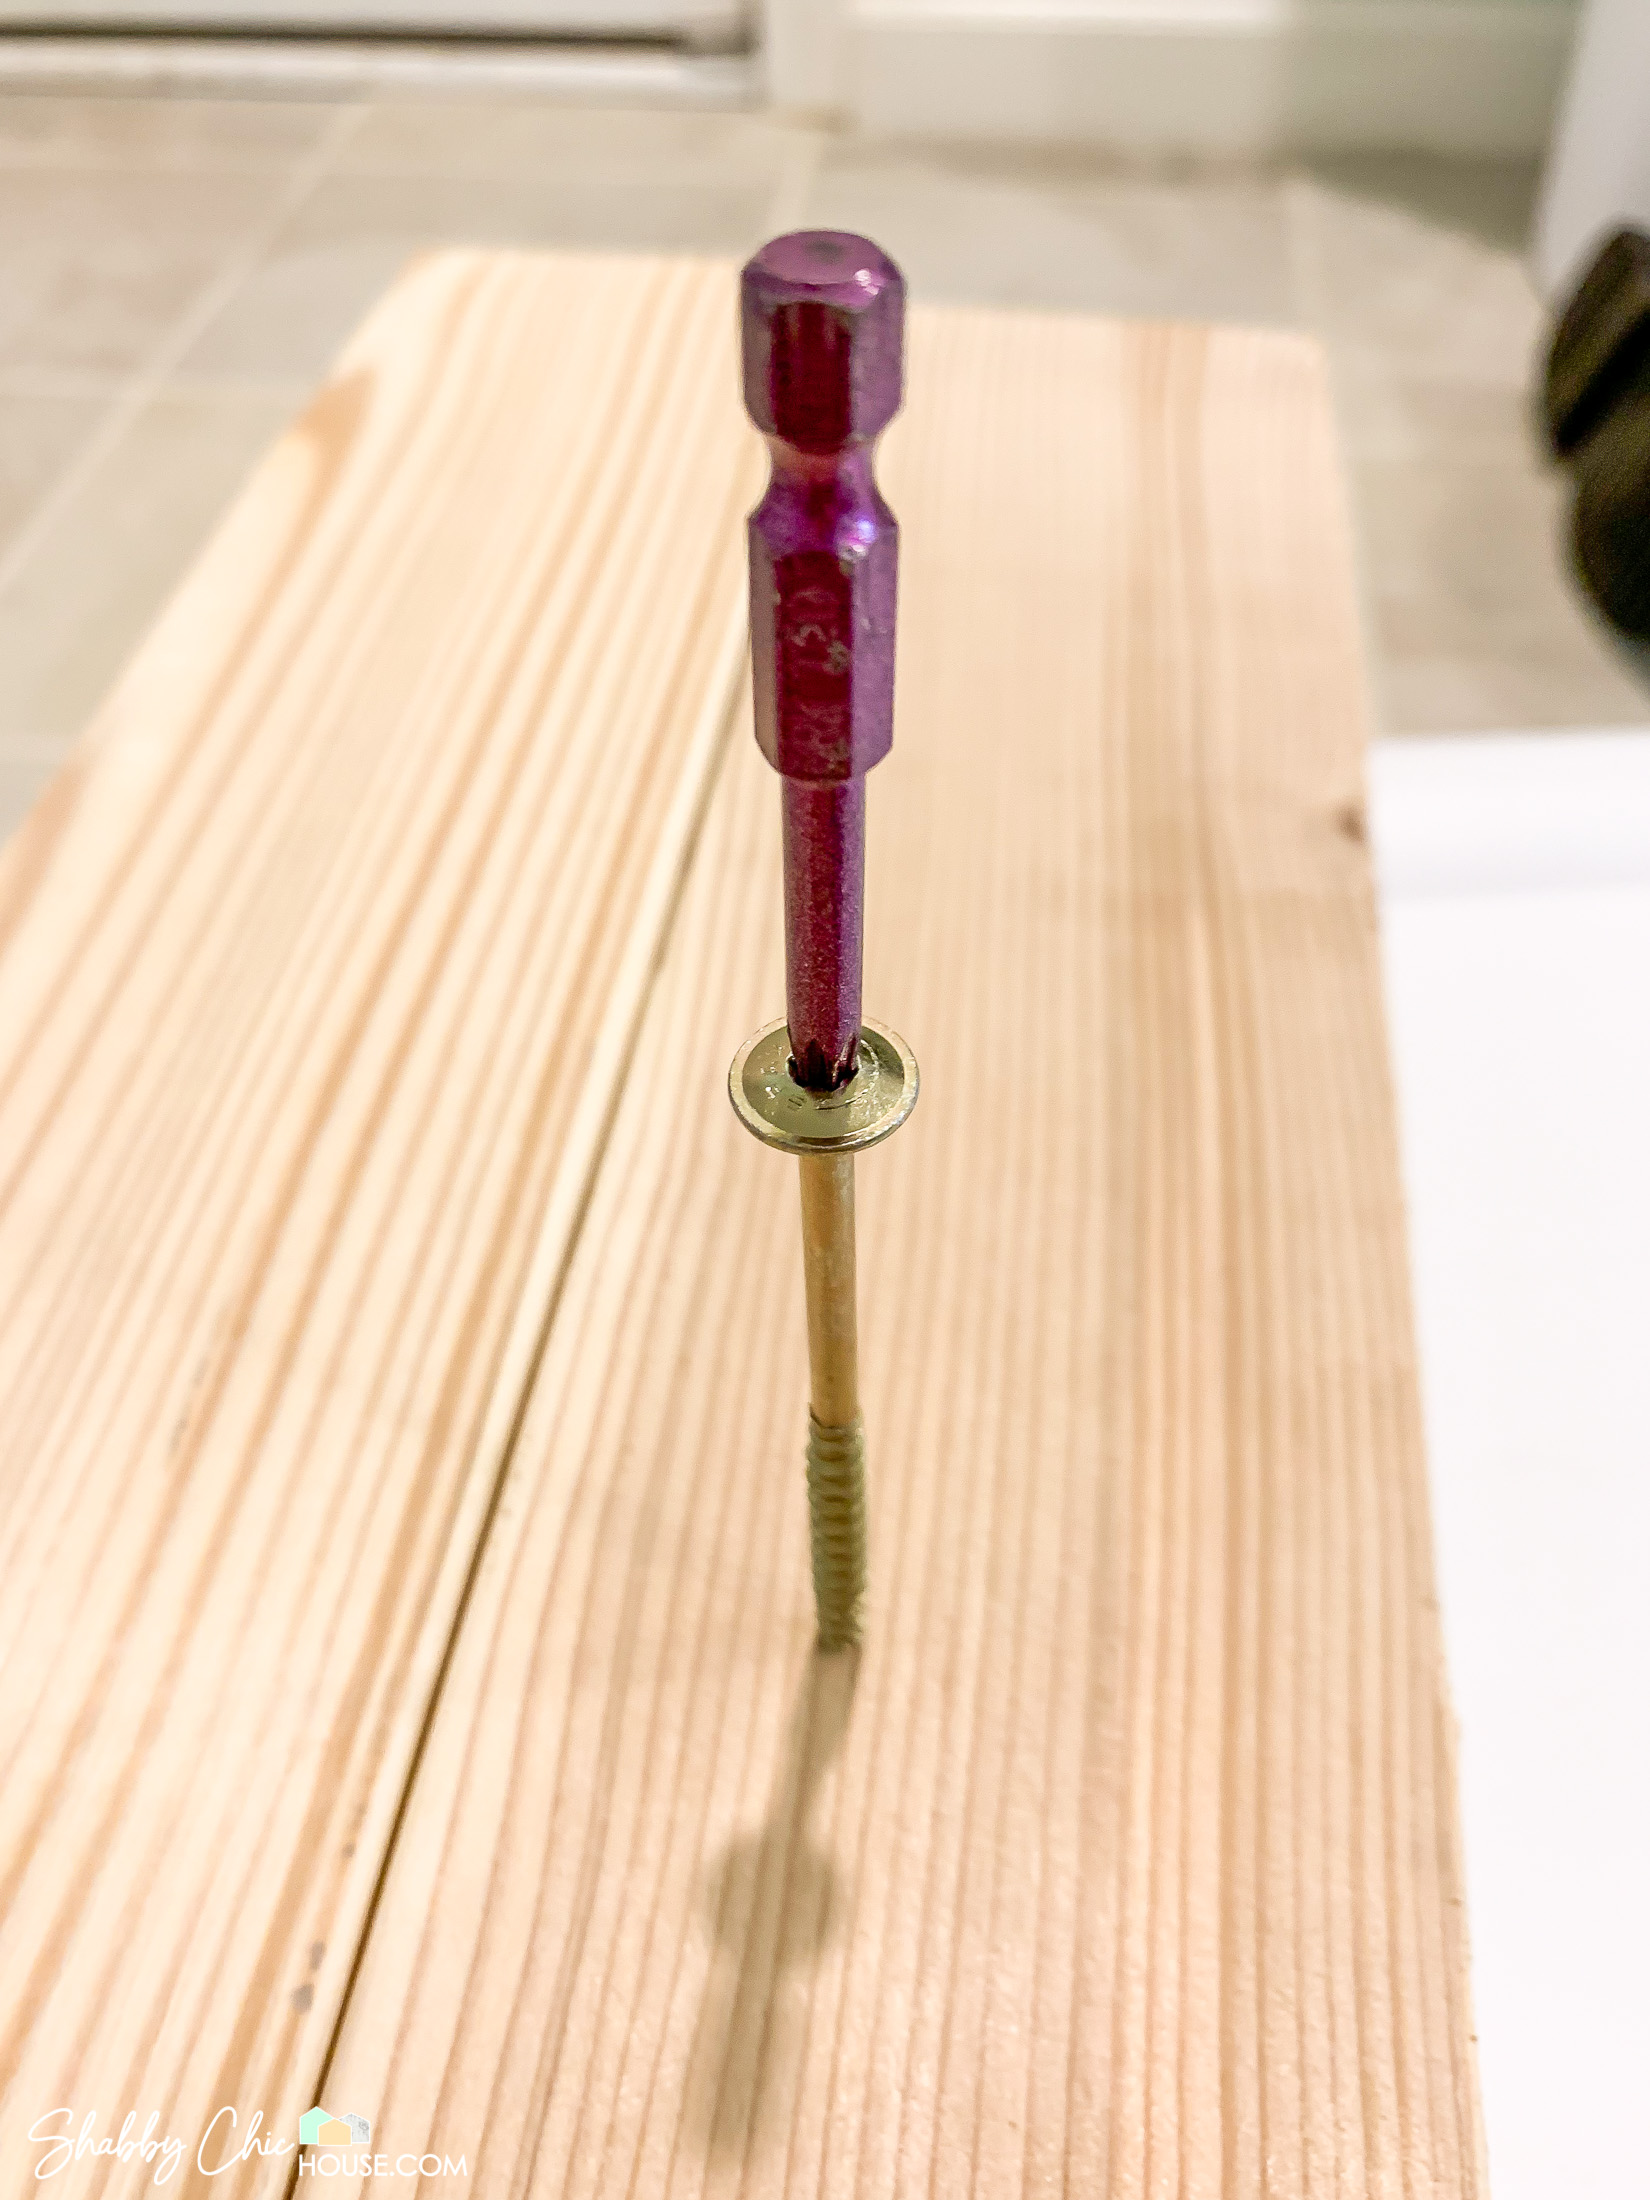
Now in regards to screws, I used Spax’s 3″ T-Star head screws. These bad boys use a star-shaped bit and will never slip or get stripped like your standard screws. These screws are heavy-duty and when sunk properly into your studs can handle a pretty heavy load.
Now here’s really where an awesome laser level will blow you away. As you can see in the shot below, the laser level projects a line on the left side wall, the back wall and right side wall – making it amazingly easy to frame your shoe shelf, bench, and shelves with perfect accuracy (Yeah, you can call me Bob Villa).


Once you’ve measured and cut your 2×4’s, use a stud finder and mark where the studs are behind the wall. Screwing your bench frame into the studs will significantly increase the strength and load bearing ability of your bench.
In addition to Spax screws, I also used these 90 degree braces to provide additional support and strength.

For my project, I could only put up the two side 2x4s and the back 2×4 to start. If I completed the entire bench frame then I would have trouble putting in the shoe shelf which I had not yet cut or stained.
Measuring & Cutting Your Shelve Supports
At the same time start taking measurements, cutting and dry fitting the supports for your shoe shelf, side shelves and main shelf. While you should use 2×4’s for your load-bearing bench, 1″ wide pine should work well for all your other shelves.
When building the frame/supports for my shoe shelf I made sure the depth of the shelf was about 4 – 4.5 inches shorter than my bench. This is ideal because when you sit on the bench, you don’t want your heels to hit the shoe shelf.
After I measured, cut and dry fit each support, I took a Sharpie and labeled the back of each piece of wood. For example, for my shoe shelf supports had the following labels:
- Back Wall Support – Shoe Shelf
- Left Side Wall Support – Shoe Shelf
- Right Side Wall Support – Shoe Shelf
- Left Front Wall Support – Shoe Shelf
- Right Front Wall Support – Shoe Shelf
I did the same for all four of my side shelf supports as well as my primary top shelf supports. This allowed me to sand, prime and paint all of my supports in one quick fell swoop.
Painting Your Shelf Supports
Sand each piece of wood with a 100 grit and then 400 grit piece of sand paper. Clean each piece of wood after sanding, then prime and paint. I used two coats of Sherwin-Williams’ Extra White paint.

How to Cut Your Shelf Tops
For all of my shelf tops, I used 1/4 inch thick birch plywood from Home Depot. This is a great piece of wood with an amazing grain that will really come to life when you apply your stain. For my stain, I used Varathane’s Early American.

Also, before heading to Home Depot I took measurements and a gentlemen in the lumber department was able to rip them horizontally for me. When I got them home, I remeasured the width of the closet at the appropriate heights and then shortened them to fit.
In the photo below you can see me dry fitting (again) and testing out both the side and top shelves.
Creating the U-Shaped Shelf
One of the most impressive parts of this closet is the U-shaped top shelf which I created out of a single piece of my birch plywood. Again, I drew a mock-up and carefully measured both side shelves and after some thought felt 12″ was the proper center depth for my primary/top U shelf.

I made my top U shaped shelf using a fairly inexpensive, but high quality Ryobi jig saw.
Use a fine blade with your jig saw to keep the wood from splintering. Originally I attempted to use a guide that came with my Ryobi to cut a perfectly straight line, but quickly found out that I could actually cut a significantly straighter line by free handing and following the straight line I drew. My initial cut was not 100% perfect, but I made sure if I was going off my cut line, I was leaving a little extra wood which could later be leveled out with my sander. In the end this U-cut was a lot easier than I imagined and the shelf turned out amazing.
Measuring You Bench Top
As I was measuring the birch plywood for the top of my bench I added on an additional 1/4″ beyond where my 2×4 frame terminated. You’ll want to create this small 1/4″ overhang, so when you add your faceplate there is a nice and flush finish.
Staining Your Shoe Shelf & Bench
After cutting and testing the fit of your shoe shelf and bench, hit both with your palm sander (including all the edges), clean with a damp rag and begin staining. Use an old microfiber cloth and make sure to hit the edges of your plywood first and then the tops. As you’re staining the plywood make sure to keep moving and evenly spread/rub in the stain.

After about two coats of stain have dried, apply a protective coat using finishing wax/paste. I used Minwax’s Fine Finishing Paste. Once you get a nice coat of wax on, let it sit for 15-20 minutes. After, buff off the excess wax to get that perfect shine.

Hanging Your Shelf Supports
Now back to our closet where we’re ready to start hanging our painted shelf supports. Before screwing your shelf supports, drill pilot holes and use a countersink bit. Both of these steps are essential as without the pilot holes your 1″ support will split and without your countersunk heads, you won’t be able to hide the screw heads and have a clean look.

Check out the shot below showing the face-melting awesomeness of the Bosch laser level again! You can see how amazing this tool is at helping you make sure that all of your shelves are perfectly level. Truly some cool Bob Villa tech in action here.

Finishing Your Bench Frame
Before you finish building your bench frame, you’ll need to install your shoe shelf supports and stained shoe shelf top. This bottom shoe shelf will be impossible to install after you build you bench frame.

Originally I considered constructing my bench with three 2×4’s running parallel lengthwise, but felt the design below was significantly stronger. Also, I used a combination of 90-degree braces and joist hangers to build my frame. In the end, it’s going to take a sledgehammer to take this bench down. It can easily take on 300+ pounds and should hold up for many years to come.

Attaching Your Bench Faceplate
My bench face plate is about 4 1/4″ wide, which nicely covers the 2×4 bench frame. Once you have the top of your bench in place, fit your faceplate flush with the top of the bench and use 2 clamps to hold the board in place while you attach it with screws from the inside. I used spax’s 1.25″ screws and was extra careful not to drill too far and go through the front of the faceplate.


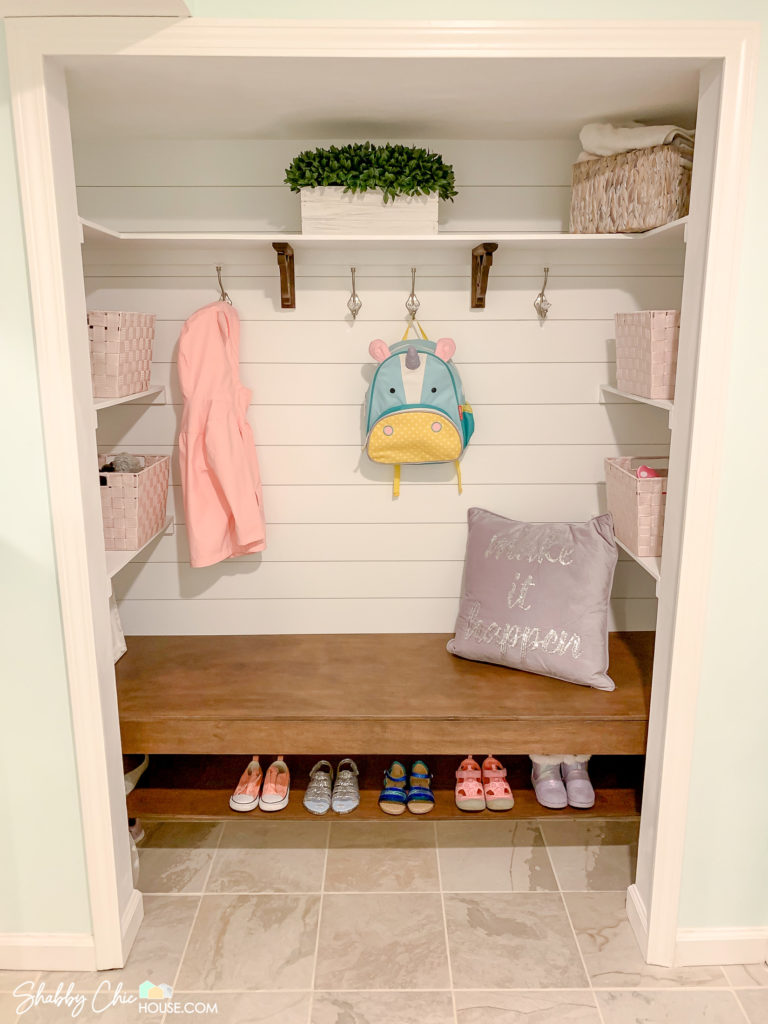
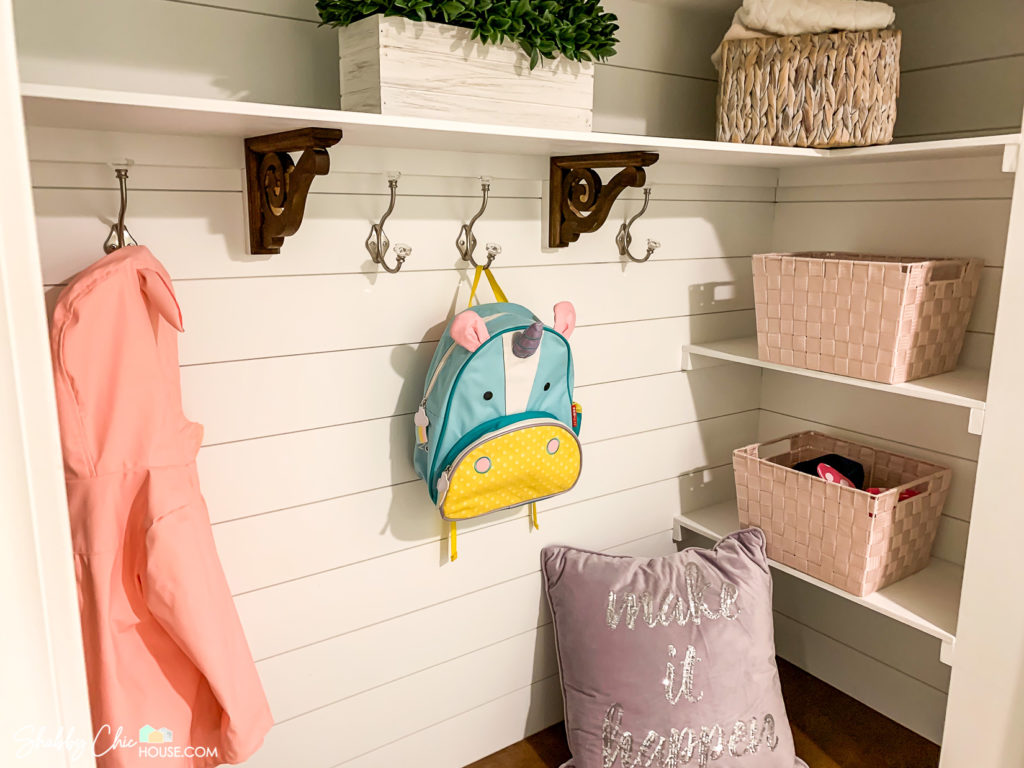
Final Touches: Corbels and Coat Hooks
To give your closet makeover that final touch, you might consider adding corbels and coat hooks. I picked up both at my local Home Depot.
For the corbels, I used the same stain I used on my bench and needed to cut a small piece of my 1″ shelf support wood to put behind the corbels, so they rested flush against the wall.
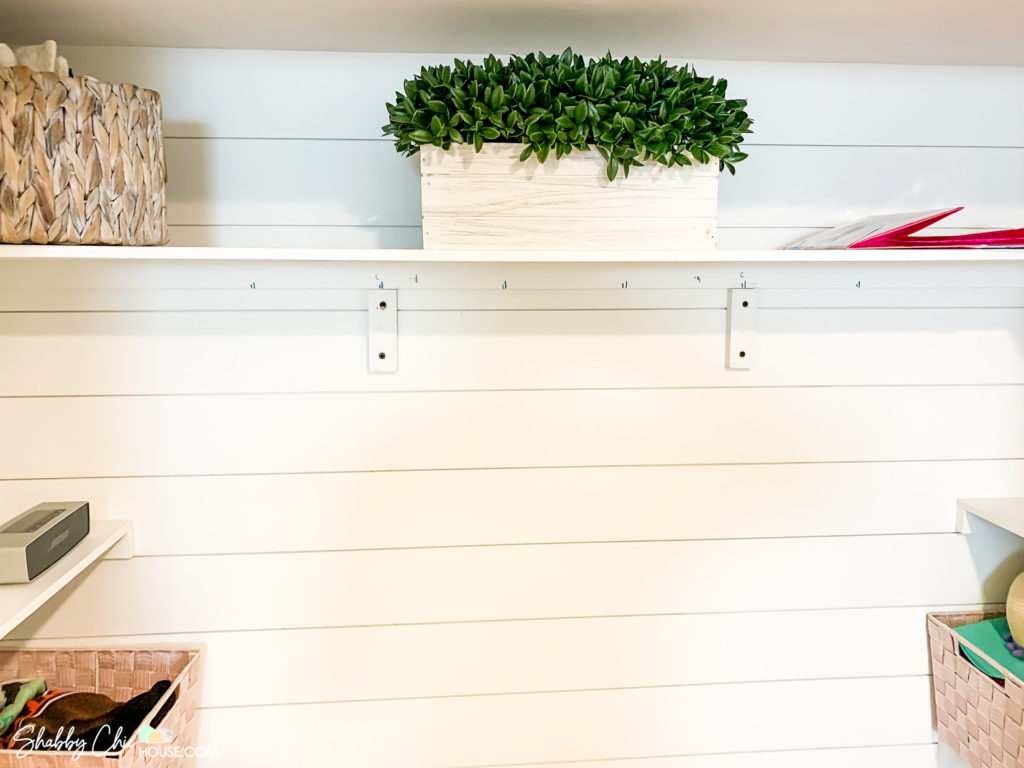
In order to know exactly where to put your hanging screws for your corbels ,insert a screw into the corbel bracket, place it flush against your 1″ supports and make an indentation/mark on the bottom of your shelf. This will help you eliminate any guessing as to where to put your screws for hanging the corbel.


Conclusions
There’s quite a bit that goes into this project, but in the end it turned out amazing. We now have a shabby chic shiplap entryway nook that looks amazing and is also functional. It can store towels, winter gloves/hats, coats, bags, shoes and in the morning provides great place for me to put on my shoes before I head to work.
If you loved this article, check out one of our latest posts about the new ShabbyChicHouse & 7 Upcoming Home Improvement Projects.
Below are some great photos of the new house, mirrored backsplash project, Carrara tile fireplace surround project and landscape lighting project that we think will blow you away.


The new shiplap entryway nook closet is shiny and functional. I would like to follow your steps to add one in my entryway.